TravelGates
TravelGates
Teleportation System & Nether Portals Substitution
Latest version: v1.10.18 [1.6.4-R0.1]
- Download (BukkitDev)
Watch the source code of TravelGates on GitHub.
Description
This plugin intends to set teleporting destinations where player can be teleported if he is standing on anonther destination. To split destinations as if they were on separated servers, player's inventory can be cleared. The player is facing the same direction, after being teleported, as the OP when the destination is created. The teleportation works through different worlds too. You can also use Nether Portals to be teleported. Just add a "TravelGates" Sign on the Nether Portal, facing the player's head. Teleportation blocks also allow you to be teleported around an existing destination. You can also manage additional worlds.
Check this page for more detailed information about the teleportation system.
This plugin is multilangual. There are only 2 languages (English and French) provided with the plugin. You can modify the messages file or create your own in another language.
Compatibility with Bukkit:
This plugin must be used with Craftbukkit version 1.1-Rx. Previous versions won't work.
Video tutorials
- Tutorial by ANDREJJGaming. (Installation + Ingame how-to)
- Tutorial by Minecrafter9842. (Installation + Ingame how-to)
- Tutorial by VariationVault. (Ingame how-to)
- Tutorial by LastWishSpain. (Complete tutorial in Spanish)
- Tutorial by AbsintoJ. (Complete tutorial in Portuguese)
How to setup this plugin from scratch
- Download the latest build: TravelGates-x.x.x.zip, where x.x.x is the latest version
- Extract this archive. You have two files : TravelGates-x.x.x.jar and resources-x.x.x.zip
- Extract the resrouces-x.x.x.zip archive
- Create a directory named "TravelGates" in your "plugins" directory, inside the directory of your Minecraft server (optionnal)
- Move the TravelGates-x.x.x.jar file in the "plugins" directory
- Inside the resources directory you have created by extracting the previous archive, move the travelgates.conf file in the "TravelGates" directory
- Repeat the previous step with the language file of your choice. You can find samples of language files in the "resources\messages" directory. (feel free to update existing files or make your own)
- Configure the configuration file as it is described in the Readme (page or file) or check the next section below with all configuration paramaters.
- Restart the Minecraft server
- Enjoy !
Please see the README page for more information.
You can also go to the english language sample file page to configure the ingame messages.
Check the Permissions page for more information about permissions nodes used in this plugin. If you want to use permissions but don't know how to set them, check this Bukkit wiki page. Otherwise, just disable permissions in the configuration of this plugin and op/non-op conditions will apply (users permissions will be given to all non-op players and admins permissions only for op players).
If you want to see an example of the default configuration file, click here !
Configuration parameters
- language: set the language used to display messages to players. Has to be the same value as the message file name in the TravelGates directory. (Example : language=en -> messages_en.lang
- usepermissions: (true/false) use PermissionsBukkit or PermissionsEx or Permissions 2x/3x or Native Bukkit Permissions (in that order, depending on what plugin you have)
- teleportwithsign: (true/false) enable the sign to teleport by clicking on it
- teleportwithportal: (true/false) enable Nether Portals substitution
- debug: (true/false) used to enable the debug mode when the plugin is loading.
- clearallinventory: (true/false) used to clear the armor content when the "i" option is set to a destination
- protectadmininventory: (true/false) used to protect admin inventory when the clear inventory option is enabled
- tpblock: (type[,data]/disabled) used to select the teleport block. Type is for a material (example "wool") and data is for the wool color (ex: "lime") or the tree species (ex: "birch"). You can use the numerical data or its name.
Plugin usage
Main command is "/travelgates" but you can use the alias "/tg".
All commands and destinations are case insensitive.
See the Examples page to see examples of the most "complicated" commands this plugin offers.
Admin commands:
- /tg {destination} : teleport player
- /tg add {destination} [-options] : add a destination.
- /tg del {destination} : delete a destination.
- /tg save : force to save all destinations
- /tg debug : toggle the debug mode
- /tg dtm : display or not the teleport messages
- /tg options {destination} -[options] : update destination's options. Tthe "-" character is mandatory.
- /tg update {destination} -[options] : same as /tg options
- /tg worlds ({world}|*) [-lu] [world_type]: display available loaded worlds with no options. World name use the same pattern as destinations. Wildcard * can be used to display all worlds in the server directory. Use options [-lu] to load or unload a world. Without options, it will display the state of the world (loaded or unloaded). With the l option is used, you can add the world type : (normal|nether|end), default is normal. You can't unload worlds which have still some players.
- /tg config: display current configuration
- /tg perms : toggle the permissions activation (reload permissions configuration if you enable them)
- /tg signtp : toggle the usage of sign to teleport
- /tg portaltp : toggle the usage of the nether portal to teleport
- /tg clearallinv : toggle the state of the clear all inventory option
- /tg clearallinv : toggle the state of the protect admin inventory option
- /tg autosave : toggle the auto save
- /tg tpblock : modify or toggle the tp block
- /tg {destination} [-f] : teleport player to the destination if he is standing on an existing location. If using -f, the teleportation can be done from everywhere.
Users commands:
- /tg list : display all destinations available to the player.
- /tg details {destination} : display all destinations, their locations and options to the player. You can specify a destination to see its own details.
- /tg restrict {destination} : display allowed destinations from the given destination
- /tg loc {destination} : display location of the destination.
- /tg name : display the name of the location where the player is standing.
- /tg help : display short help of the plugin.
- /tg {destination} : teleport to the destination.
Other teleportation means:
- Right click on a sign containing on a line [TG] or [TRAVELGATES] (case insensitive) and on another line or on the same line (order doesn't matter) the name of an existing destination : do the same as /tg {destination}.
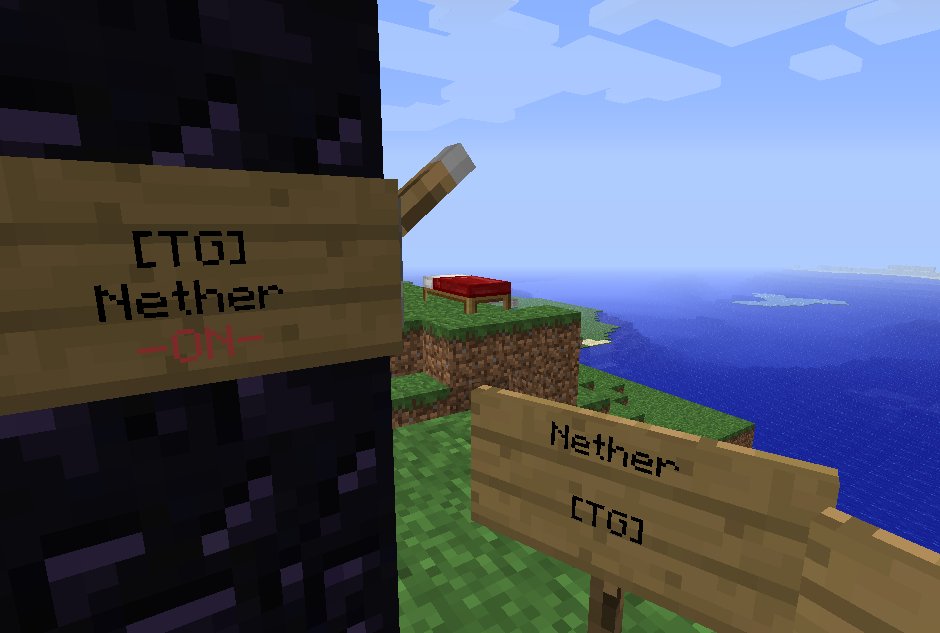
- Use Nether Portals : Place a TravelGates' sign (see above) on a Nether Portal with the "-ON-" state (defined in messages file), configured with a lever or directly on the sign, and use the Portal as usual. The sign has to be placed on the portal bloc facing the head of the player. You can place the destination on the Obsidian blocks or on blocks beside of the portal.
- Using a teleport block: You can be teleported if you use a teleportation block, for instance lime wool. You have to cover a rectangle surface containing the destination with this kind of block to be teleported. Max range around the destination is 5 block (6 with the destination block). All these block have to be at the same height. Just under the player location when the destination has been added.
- Check this page for more detailed information about Nether Portals and Teleportation block features.
Available options:
- i = clear inventory while travelling to a destination
- a = admin teleport only
- s = instant save when adding a new destination or updating the options
- p = set the position of your destination as following -p(world,x,y,z) or -p(x,y,z), and "y" can be equal to "?"
- r = set restricted destinations where players are allowed to go as following : -r{dest1,dest2,dest3} -r{+dest1,-dest2} -r{} -r
- f = force the teleportation to a destination (without being on another destination)
Example: /tg add mydest -iar{test}p(world,5,?,20)s -> Add the destination "mydest", clear the inventory after being teleported, "mydest" is only for admins, the "test" destination is the one target destination allowed to travel to, the location is in the world named "world" at the location x=5, y=max available height, z=20, and finally save the new destination.
More exhaustive information in the README.txt file
More about the Nether Portals usage:
- You have to use a TravelGates sign. So, the destination and the TravelGates tag.
- You can use a lever to toggle the state of the Portal or type it manually.
- The states can be modified in the messages file, instead of using -ON- and -OFF-
- -ON- with the tag [TG] (or [TRAVELGATES]) and an existing destination : you will be teleported to the destination
- -OFF- Regular Nether teleportation.
- If the Sign is invalid, you will be teleported to the Nether.
- If the destination is the same where the portal is standing, teleportation will be canceled. If the Portal is not placed on an existing destination, or adjacent to an existing destination, the teleportation will also be canceled.
Medias
Source code on GitHub :
Source Code
Videos :
New youtube video of Nether Portals (in v1.5)
French youtube trailer (in v1.0)
Pictures:
Some example of TravelGates's teleportation Signs:


Sign control to enable/disable the Nether Portal Substitution :


Changelog
Please see the Changeslog page
Next versions
Version 2 stopped.
Known bugs
- If you add other worlds, Nether Portal won't send you to the Nether. Make another nether world and link a TravelGate portal to it or link the portal to the regular Nether world.
- It is not a bug, but you have to know it. If you try to modify the configuration file manually and try to reload all plugins with the /reload command, it would not work. All data is saved when the plugin is disabled, with the current ingame config. So, your configuration manually changed will be ignored.
In Case of Bugs
If you encounter some bugs, please use the /tg debug in game command and send me the server logs by creating a new ticket.You can also enable the debug mode at the beginning of the plugin loading by using the configuration "debug=true" in the configuration file. Thanks.
Latest version: v1.10.18 [1.6.4-R0.1]
- Download (BukkitDev)
Description
This plugin intends to set teleporting destinations where player can be teleported if he is standing on anonther destination. To split destinations as if they were on separated servers, player's inventory can be cleared. The player is facing the same direction, after being teleported, as the OP when the destination is created. The teleportation works through different worlds too. You can also use Nether Portals to be teleported. Just add a "TravelGates" Sign on the Nether Portal, facing the player's head. Teleportation blocks also allow you to be teleported around an existing destination. You can also manage additional worlds. Check this page for more detailed information about the teleportation system. This plugin is multilangual. There are only 2 languages (English and French) provided with the plugin. You can modify the messages file or create your own in another language. Compatibility with Bukkit: This plugin must be used with Craftbukkit version 1.1-Rx. Previous versions won't work.Video tutorials
- Tutorial by ANDREJJGaming. (Installation + Ingame how-to)
- Tutorial by Minecrafter9842. (Installation + Ingame how-to)
- Tutorial by VariationVault. (Ingame how-to)
- Tutorial by LastWishSpain. (Complete tutorial in Spanish)
- Tutorial by AbsintoJ. (Complete tutorial in Portuguese)
How to setup this plugin from scratch
- Download the latest build: TravelGates-x.x.x.zip, where x.x.x is the latest version
- Extract this archive. You have two files : TravelGates-x.x.x.jar and resources-x.x.x.zip
- Extract the resrouces-x.x.x.zip archive
- Create a directory named "TravelGates" in your "plugins" directory, inside the directory of your Minecraft server (optionnal)
- Move the TravelGates-x.x.x.jar file in the "plugins" directory
- Inside the resources directory you have created by extracting the previous archive, move the travelgates.conf file in the "TravelGates" directory
- Repeat the previous step with the language file of your choice. You can find samples of language files in the "resources\messages" directory. (feel free to update existing files or make your own)
- Configure the configuration file as it is described in the Readme (page or file) or check the next section below with all configuration paramaters.
- Restart the Minecraft server
- Enjoy !
Configuration parameters
- language: set the language used to display messages to players. Has to be the same value as the message file name in the TravelGates directory. (Example : language=en -> messages_en.lang
- usepermissions: (true/false) use PermissionsBukkit or PermissionsEx or Permissions 2x/3x or Native Bukkit Permissions (in that order, depending on what plugin you have)
- teleportwithsign: (true/false) enable the sign to teleport by clicking on it
- teleportwithportal: (true/false) enable Nether Portals substitution
- debug: (true/false) used to enable the debug mode when the plugin is loading.
- clearallinventory: (true/false) used to clear the armor content when the "i" option is set to a destination
- protectadmininventory: (true/false) used to protect admin inventory when the clear inventory option is enabled
- tpblock: (type[,data]/disabled) used to select the teleport block. Type is for a material (example "wool") and data is for the wool color (ex: "lime") or the tree species (ex: "birch"). You can use the numerical data or its name.
Plugin usage
Main command is "/travelgates" but you can use the alias "/tg".All commands and destinations are case insensitive. See the Examples page to see examples of the most "complicated" commands this plugin offers. Admin commands:
- /tg {destination} : teleport player
- /tg add {destination} [-options] : add a destination.
- /tg del {destination} : delete a destination.
- /tg save : force to save all destinations
- /tg debug : toggle the debug mode
- /tg dtm : display or not the teleport messages
- /tg options {destination} -[options] : update destination's options. Tthe "-" character is mandatory.
- /tg update {destination} -[options] : same as /tg options
- /tg worlds ({world}|*) [-lu] [world_type]: display available loaded worlds with no options. World name use the same pattern as destinations. Wildcard * can be used to display all worlds in the server directory. Use options [-lu] to load or unload a world. Without options, it will display the state of the world (loaded or unloaded). With the l option is used, you can add the world type : (normal|nether|end), default is normal. You can't unload worlds which have still some players.
- /tg config: display current configuration
- /tg perms : toggle the permissions activation (reload permissions configuration if you enable them)
- /tg signtp : toggle the usage of sign to teleport
- /tg portaltp : toggle the usage of the nether portal to teleport
- /tg clearallinv : toggle the state of the clear all inventory option
- /tg clearallinv : toggle the state of the protect admin inventory option
- /tg autosave : toggle the auto save
- /tg tpblock : modify or toggle the tp block
- /tg {destination} [-f] : teleport player to the destination if he is standing on an existing location. If using -f, the teleportation can be done from everywhere.
- /tg list : display all destinations available to the player.
- /tg details {destination} : display all destinations, their locations and options to the player. You can specify a destination to see its own details.
- /tg restrict {destination} : display allowed destinations from the given destination
- /tg loc {destination} : display location of the destination.
- /tg name : display the name of the location where the player is standing.
- /tg help : display short help of the plugin.
- /tg {destination} : teleport to the destination.
- Right click on a sign containing on a line [TG] or [TRAVELGATES] (case insensitive) and on another line or on the same line (order doesn't matter) the name of an existing destination : do the same as /tg {destination}.
- Use Nether Portals : Place a TravelGates' sign (see above) on a Nether Portal with the "-ON-" state (defined in messages file), configured with a lever or directly on the sign, and use the Portal as usual. The sign has to be placed on the portal bloc facing the head of the player. You can place the destination on the Obsidian blocks or on blocks beside of the portal.
- Using a teleport block: You can be teleported if you use a teleportation block, for instance lime wool. You have to cover a rectangle surface containing the destination with this kind of block to be teleported. Max range around the destination is 5 block (6 with the destination block). All these block have to be at the same height. Just under the player location when the destination has been added.
- Check this page for more detailed information about Nether Portals and Teleportation block features.
- i = clear inventory while travelling to a destination
- a = admin teleport only
- s = instant save when adding a new destination or updating the options
- p = set the position of your destination as following -p(world,x,y,z) or -p(x,y,z), and "y" can be equal to "?"
- r = set restricted destinations where players are allowed to go as following : -r{dest1,dest2,dest3} -r{+dest1,-dest2} -r{} -r
- f = force the teleportation to a destination (without being on another destination)
- You have to use a TravelGates sign. So, the destination and the TravelGates tag.
- You can use a lever to toggle the state of the Portal or type it manually.
- The states can be modified in the messages file, instead of using -ON- and -OFF-
- -ON- with the tag [TG] (or [TRAVELGATES]) and an existing destination : you will be teleported to the destination
- -OFF- Regular Nether teleportation.
- If the Sign is invalid, you will be teleported to the Nether.
- If the destination is the same where the portal is standing, teleportation will be canceled. If the Portal is not placed on an existing destination, or adjacent to an existing destination, the teleportation will also be canceled.
Medias
Source code on GitHub : Source Code Videos : New youtube video of Nether Portals (in v1.5)French youtube trailer (in v1.0) Pictures: Some example of TravelGates's teleportation Signs:


Sign control to enable/disable the Nether Portal Substitution :


Changelog
Please see the Changeslog pageNext versions
Version 2 stopped.Known bugs
- If you add other worlds, Nether Portal won't send you to the Nether. Make another nether world and link a TravelGate portal to it or link the portal to the regular Nether world.
- It is not a bug, but you have to know it. If you try to modify the configuration file manually and try to reload all plugins with the /reload command, it would not work. All data is saved when the plugin is disabled, with the current ingame config. So, your configuration manually changed will be ignored.
In Case of Bugs
If you encounter some bugs, please use the /tg debug in game command and send me the server logs by creating a new ticket.You can also enable the debug mode at the beginning of the plugin loading by using the configuration "debug=true" in the configuration file. Thanks.Comments


-

_ForgeUser7744057 Owner
-
View User Profile
-
Send Message
Posted Apr 11, 2012@123pest
Well, have you carefully read this page : http://dev.bukkit.org/server-mods/travelgates/pages/tricky-information-about-teleportation-systems/
It explains how the teleportation works.
To sum up, you must be on an existing destination to be allowed to go to another one. If you just try to go somewhere using /tg test1, and if you aren't on the destination test2, it would never work ! (If you are an admin and you add the "-f" option at the end of this command, it should work, because it force the teleportation)
Read all the main page. All information you need is there.
-
View User Profile
-
Send Message
Posted Apr 10, 2012my problem is every time i try to use it it just said "TOU_CAN_NOT_GO_THERE"
iv tried signs with
(test1 and test2 are the destinations) i used the command to add the destinations
1: 2: [TG] 3: test1 4:
1: 2: [TG] 3: /tg test1 4:
and they both dont work. i cant watch the vid as my dad has blocked youtube, plz help
-
View User Profile
-
Send Message
Posted Mar 29, 2012@johnatham9
You are welcome ;)
I know my plugin is not really convenient to configure... But I wanted to make it the most configurable and flexible. But it implies more complexity :(
-
View User Profile
-
Send Message
Posted Mar 28, 2012@Ghomerr
thank you<sub> i got it now</sub>
-
View User Profile
-
Send Message
Posted Mar 28, 2012@johnatham9
You should have configured the messages wrongly. Above all if you have all your messages like this. If only this one is missing (or these messages), check if they are present in your messages file.
Check the configuration "language" and if you have the correct messages file associated with this configuration in the plugin directory.
For instance, you choose the language "english". You set the configuration to "language=en". Then, copy the messages file named "messages_en.lang" in the plugin directory "TravelGates".
(The plugin searches a file named messages_xx.lang where xx is equal to the value of the configuration "language" in the config file).
The message configuration is not modifiable ingame. You have to stop the server, configure correctly the messages, and restart.
I think it could be good to plan a command to allow language configuration ingame...
-
View User Profile
-
Send Message
Posted Mar 28, 2012@Ghomerr
not sure what im doing wrong. the ingame message that you teleported is <YOU_ARE_ARRIVED_AT><INVENTORY_KEPT> its in red and not showing what its supposed to
-
View User Profile
-
Send Message
Posted Mar 27, 2012What do you think of today ? :D
I am going to prepare the update.
By the way: did you encounter some bugs using my plugin with the version 1.2.x of Craftbukkit ?
Edit: it's out. Edit²: I made 2 versions today, because I've found a little bug while testing something on a server where the plugin is set up.
-
View User Profile
-
Send Message
Posted Mar 27, 2012When is 1.2.4 coming out? I LOVE THIS PLUGIN!
-
View User Profile
-
Send Message
Posted Feb 14, 2012I will have a little break on this plugin because I would like to begin another one, that I really want to do. It will be a "game" plugin.
I will fix bugs which would be reported to me as soon as possible. Evolutions will wait. Do not hesitate to suggest other features you would like to see in the next versions.
Here is my Todo list for future evolutions (in order of priority):
Thank you for those who use my plugin and for everyone who helped me by reporting bugs and suggesting some nice features :)
Edit: I will make updates for Recommanded Builds.
-
View User Profile
-
Send Message
Posted Feb 9, 2012@Stigern: could you paste here your config file and the name of the messages file ?
The permission file used in Pex, could also be usefull.
If you have some problems with Pex, I would recommand to use the native Bukkit's permissions system that is really easy to manage.
I have not played a lot with the Pex permissions plugin, but when I tried it once, it worked. But not tested since the first time.
-
View User Profile
-
Send Message
Posted Feb 9, 2012I just don't get this.
Plugins .jar file is in my Minecraft/Plugins/travelgates.jar I've put my language file in the Minecraft/Plugins/TravelGates/ And the config file.
When I reload the server it says "Messages Resourcefile not found" I've set up pex so that I got all the permissions for using this plugin.
But /tg add isn't allowed for me.
-
View User Profile
-
Send Message
Posted Jan 29, 2012@bronzo09: check if you are standing on another existing destination. You can check if it works by using the command /tg <your_destination> -f (if you have the permission travelgates.forcetp). You can also you Nether Portal to teleport or "teleportation blocks".
@Eugoney: this plugin does not load other worlds. You have to use a "world management" plugin to load new worlds. Then you can set a destination in these worlds. I have decide to not add world management because it has nothing to do with this plugin and other plugins do that very well. If there were other people asking for it, I may add this in a next version in a simple manner to load new worlds.
-
View User Profile
-
Send Message
Posted Jan 28, 2012Can I add two worlds and teleport between them with this plugin? Not like world to world_nether, i mean like having two normal worlds like world_1 and world_2.
-
View User Profile
-
Send Message
Posted Jan 22, 2012Whenever I make a destination it says YOU_CANT_GO_THERE
-
View User Profile
-
Send Message
Posted Jan 20, 2012Yeah, sure.
I hope I could make an update this weekend. I will add several permissions nodes to seperate different means of teleportation.
-
View User Profile
-
Send Message
Posted Jan 10, 2012hello, i posted you a ticket for feature i neeed, (bypasspermissions).
I need the users can use a sign but not the command /tg destination to put the command for another rank of users only.
Can you make it?