Creating Custom Cannons
Creating a custom Cannon
Building the cannon .schematic
In order to make more cannons designs, you need to make a schematic file of the cannon and export it using either Worldedit or MCedit. To create a new cannon just make a new cannon config file, and name it after your cannon. Then make a .schematic for the cannon, make sure it has the same name as the cannons config file. For creating a new cannon schematic I recommend to load and edit the default, which ships with Cannons.
A short introduction how to load/save a schematic with Worldedit can be found here:
WorldEdit Tutorials
When you make a cannon, it needs to be created a certain way for the cannon to work right. The options are very customizable and will be explained below.
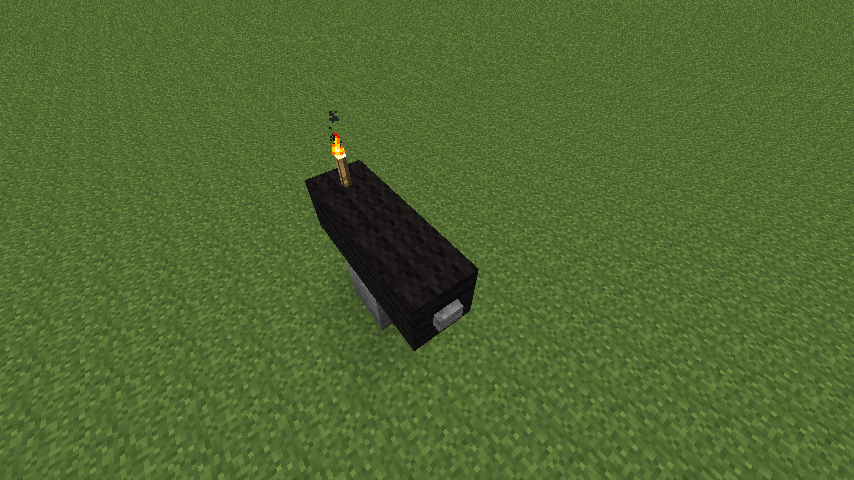
Default classic design
Lets take a look at the "classic" cannon schematic that comes with the plugin. First we load this Worldedit and paste it into our world. Below you have two pictures how this will look like.


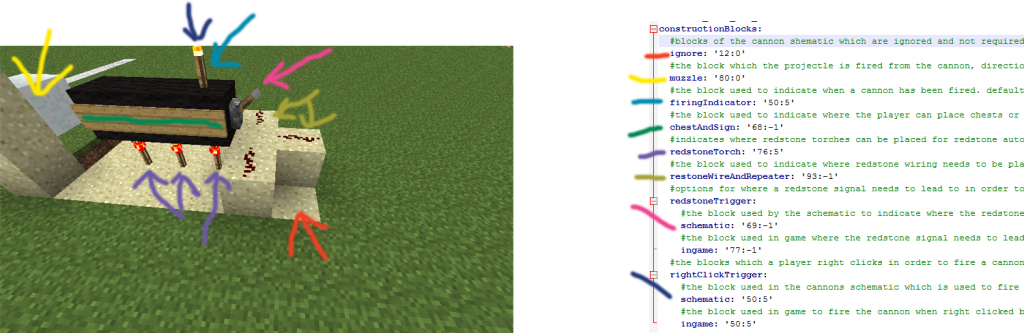
As you can see, this cannon looks a little different than when designed in game. This is because each block means something different in the config. Below is an illustration to show what links to what, below is a more detailed explanation (scroll sideways by using the scrollbar at the bottom to see the full image if it does not appear correctly)
Function of different block types
Some more detailed explanations on the options in the config file:
constructionBlocks:
  #blocks of the cannon shematic which are ignored and not required to build the cannon. Default is sand
  ignore: '12:0'
  #the block which the projectle is fired from the cannon, direction can be adjusted using the defaultHorizonatalFacing property. Default is block of snow
  muzzle: '80:0'
  #the block used to indicate when a cannon has been fired. default is torch. Makes fancy smoke on this location
  firingIndicator: '50:5'
  #the block used to indicate where the player can place chests or signs on the cannon. Default is a blank wall sign
  chestAndSign: '68:-1'
  #indicates where redstone torches can be placed for redstone autoload and firing to work. Default is redstone torch
  redstoneTorch: '76:5'
  #the block used to indicate where redstone wiring needs to be placed for redstone autoloading and firing to work. Default is redstone dust
  restoneWireAndRepeater: '93:-1'
  #options for where a redstone signal needs to lead to in order to activate redstone autoloading and firing
  redstoneTrigger:
    #the block used by the schematic to indicate where the redstone signal needs to lead to. Default is a lever
    schematic: '69:-1'
    #the block used in game where the redstone signal needs to lead to. Default is stone button
    ingame: '77:-1'
  #the blocks which a player right clicks in order to fire a cannon
  rightClickTrigger:
    #the block used in the cannons schematic which is used to fire the cannon when right clicked by a player. Default is torch
    schematic: '50:5'
    #the block used in game to fire the cannon when right clicked by a player. Default is torch
    ingame: '50:5'
As id values (id:data) you can either use '50:5' or 'TORCH:5' (since v2.3) for a up facing torch. The '5' marks the direction of a torch - in this case up. For wool the second value would be the color. You can find the name (id) for the items in the API of Bukkit/Spigot:
https://hub.spigotmc.org/javadocs/spigot/org/bukkit/Material.html
Note: Keep in mind that for some blocks (blocks, levers, torches,...) in Minecraft the data value represent its facing. Therefore a button facing west has a different data value than one facing east.
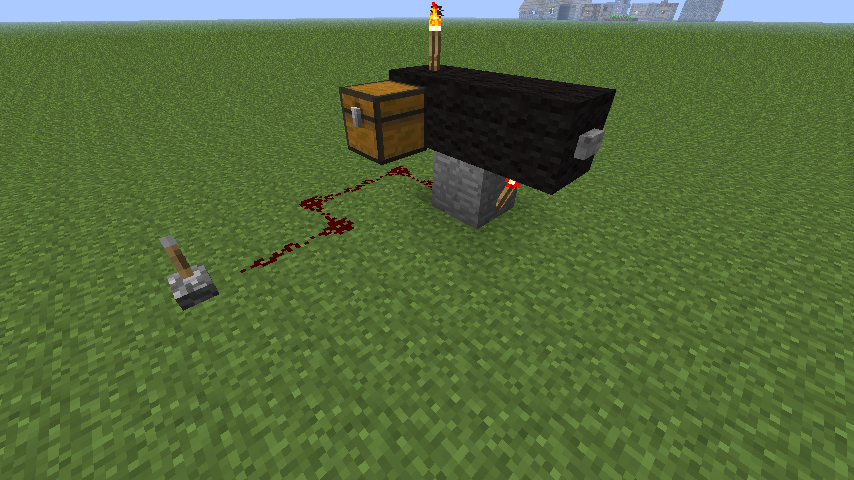
Building the cannon for use
Now then, here is how you build the same cannon to be used in game after you have set up the config file and schematic file (the stone block is just their for decoration and not required for the cannon to work)

And here is how it would be set up if it were to use redstone autoloading