Commands and Permissions
How to read command syntax
For those unfamiliar with command syntax, the words after the /CommandName are called "arguments".
Some arguments are required, these go in [square brackets]. The text inside the is a description of what to write there. E.g.
/give [item]
would be replaced with:
/give STONE
The square brackets are NOT included.
Some arguments are optional, these have ([round and square brackets]). This means that you do not have to include this argument if you don't want to. You can just skip it and move onto the next. However, if you do want to include it, it is used exactly the same way as a required argument. E.g.
/give ([player]) [item]
would be replaced with:
/give XHawk87 STONE
The round and square brackets are NOT included.
Command Permissions
Most CreateYourOwnMenus commands default to Op only. This means that only Operators can use them by default. You can allow other players to use specific commands by granting them the command permission listed beside each command. All CreateYourOwnMenus command permission nodes are in the form: cyom.commands.[command name].
Some special permissions default to none, as an operator may not necessarily want to use them. For this reason it is a bad idea to use the '*' permission node to assign yourself every permission, if wildcards are available in your permissions plugin.
If you are at all unfamiliar with Bukkit Permissions, you can read about them here: Understanding Permissions
Special Menu Commands
Although all menu commands work in menu items, there are some things that work only on menu items. These are the special menu commands:
| Command | Description |
|---|---|
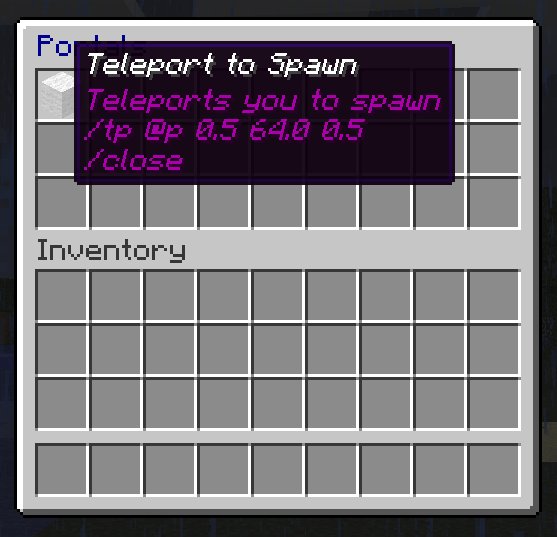
| /close | Close this menu for the clicking player. Note: This only work on menu items that are inside menus. It will have no effect if used in hand and will simply be ignored. |
| /delay [ticks] | Pause the running script on this menu item for the specified number of ticks (20 game ticks = 1 real second). After that, the rest of the commands in the script run. |
| /consume | This will remove one of the clicked item when it is run. This can be used to create consumable items that are destroyed after use. Note: This can only be used for menu items that are held in hand, not in menus. If this is on a menu item, it will simply be ignored. |
| /reload | This will reload the current menu from its YML file on disk and update it immediately for the clicking player. If you have server-side scripts running that automatically update menus, this will seamlessly display the changes made to the current player. |
| /requirecurrency [amount] | This checks if the clicking player has at least the given amount of default Vault currency. If they do not, the rest of the commands are not run. Note: You must have Vault installed for this to work, and a currency set up. |
| /requirelevel [level] | This checks if the clicking player has at least the given XP level. If they do not, the rest of the commands are not run. This can be used to implement an XP-based currency, or level requirement for certain activities. |
| /requirepermission [node] | This checks if the clicking player has the given permission. If they do not, the rest of the commands are not run. Note: If you do not have a permissions-managing plugin installed, this will only work in a rudimentary way, as ops have all permissions by default. |
CreateYourOwnMenus Commands
| Command | Permission | Description |
|---|---|---|
| /menu create [id] [rows] [title] | cyom.commands.menu.create (default op) | Create a new menu with the given id, number of rows and title text |
| /menu copy [old id] [new id] [new title] | cyom.commands.menu.copy (default op) | Creates a new menu with the same size and contents as the given menu, but with a new title and id |
| /menu edit [id] | cyom.commands.menu.edit (default op) | Open an existing menu for editing, this allows you to add/remove and move menu items around |
| /menu delete [id] | cyom.commands.menu.delete (default op) | Deletes an existing menu |
| /menu list | cyom.commands.menu.list (default op) | List all menus |
| /menu open ([player]) [id] | cyom.commands.menu.open (default op) | Open a menu with the given id, optionally for the given player, this makes it usable in menu scripts and command blocks |
| /menu grab ([player]) [menu id] | cyom.commands.menu.grab (default op) |
Grabs copies of all items in a given menu for the specified player, or the sending player if none is specified The order of items in the menu is important as it determines which slots to attempt to place the items into in the player's inventory. The top row is the hotbar, the next three rows are the main contents, and the next 4 slots are for armour, and the rest will go in any free space. If you place items in any of the specific slots, any items that are in the same place in the player's inventory will be displaced and moved to a free slot, or dropped on the ground if no space remains. If you place them in the free slots, no items will be displaced, and if there is no space in the player's inventory, those items will be dropped on the ground at the player. |
| /menu script clear | cyom.commands.menu.script (default op) | Clears all of the lore in the item in your hand. This allows you to write the script again from scratch |
| /menu script show | cyom.commands.menu.script (default op) | Displays all hidden commands in the lore of the item in your hand. |
| /menu script hide | cyom.commands.menu.script (default op) | Hides all commands in the lore of the item in your hand so that players cannot read them |
| /menu script append [text] | cyom.commands.menu.script (default op) | Add a line of text to the end of the lore of the item in your hand. This allows you to add comments and commands to the item |
| /menu script replace [index] [text] | cyom.commands.menu.script (default op) | Replaces a line of text in the lore of the item in your hand (0 is the first). This allows you to modify existing menu scripts line-by-line |
| /menu script insert [index] [text] | cyom.commands.menu.script (default op) | Inserts a line of text before the given index (0 is before first) in the lore of the item in your hand. This allows adding lines earlier than the last to menu scripts |
| /menu script delete [index] | cyom.commands.menu.script (default op) | Deletes a line of text at the given index (0 is the first) in the lore of the item in your hand. This allows removing unwanted lines in a menu script |
| /menu script title [text] | cyom.commands.menu.script (default op) | Sets the title (display name) of the held menu item to the given text. The text can contain spaces and formatting codes (&). |
| /menu reload | cyom.commands.menu.reload (default op) | Reload all menus from disk as well as the configuration file |
| /sudo [player] [command] | cyom.commands.sudo (default op) | Executes a command as if the given player had typed it. This can be used in place of (@p/) in player-targetted commands |
Target Selectors
CYOM has its own set of specialised target selectors that are designed to work with menus. They were created before Minecraft developed their own target selectors to the advanced state you now see them, and unfortunately, since we use the same syntax, you can't use the Minecraft target selectors directly in menu items.
To get around this, you can call out to custom commands in Skript or various other command aliasing or scripting plugins, or from Minecraft 1.12, you can run a function and use the more advanced selectors in there instead.
Here is a complete list of the CYOM target selectors:
| Selector | Replaced With |
|---|---|
| @p | The name of the player who activated the menu item |
| @t | The name of the targetted player. This only works if the player is holding the item in-hand and right-clicks with it on another player. |
| @x @y @z | The coordinates of the player who activated the menu item -or- If held in hand, the coordinates of the block the player holding it is pointing at |
| @m | The ID of the menu to which this item belongs. This only works if it is in a menu and not in-hand or locked inventory slot |
| @a | The name of every player on the server. This essentially runs the command once for each player and uses their name in place of the selector. |
| @a:# | The name of every player on the server within # blocks of the player who activated the menu item. This essentially runs the command once for each player and uses their name in place of the selector, but only if they are within range. |
| @w | The name of every player on the same world as the player who activated the menu item. This essentially runs the command once for each player and uses their name in place of the selector, if they are within the same world. |
| @w:name | The name of every player on the world specified by name. This essentially runs the command once for each player and uses their name in place of the selector, if they are in the named world. |
Dynamic Arguments
Dynamic arguments are used to prompt the player to enter parts of a command. E.g. who to target, how much money to send them etc.
The syntax is: {prompt text}
The text you enter between the curly braces will be the message displayed to the player who activated the menu item preceeded by "Please enter ", and followed by a colon ":" (this surrounding text can be customised in lang-eng.yml)
- E.g. If you had a command like this: /give @p minecraft:diamond {a number}
- The player would receive a prompt like this: "Please enter a number:"
- Say I entered '6' into chat, it would then run the command: /give XHawk87 minecraft:diamond 6
- I would then receive 6 diamonds!
You can use this to prompt for any text, however, since this predates Minecraft's inclusion of NBT data tags in commands, we ended up using the same syntax, and this means that you can't use NBT data tags in menu script commands directly.
To get around this, you can call out to custom commands in Skript or various other command aliasing or scripting plugins, or from Minecraft 1.12, you can run a function and use NBT data tags in there instead.
Slot Locking
Slot locking works using permissions. You must use your permissions managing plugin to assign that slot locking permission to a player.
- "cyom.slot.lock.all" locks all inventory slots, including the hotbar
- "cyom.slot.lock.hotbar" just locks the hotbar
- "cyom.slot.lock.storage" just locks the internal inventory rows, excluding the hotbar
- "cyom.slot.lock.toprow", "cyom.slot.lock.middlerow" and "cyom.slot.lock.bottomrow" lock each internal row respectively
- Finally "cyom.slot.lock.#" where # is the index number of a slot, will lock that specific slot only
There is also a special "disable.slot.locking" permission node that disables all slot locking. This is not intended to be used directly, it is designed as a failsafe to prevent players who use the '*' permission node in PEX from accidentally locking all of their slots. If you wish to lock slots, you should avoid using the '*' permission node. You can alternatively negate "disable.slot.locking", but you will also have to disable every other slot you do NOT wish to be locked.
Other Permissions
In addition to command permissions, there are also permissions for performing certain actions in-game.
Grouping
| Permission | Default | Description |
|---|---|---|
| cyom.commands.menu | op | Allows use of all /menu commands |
| cyom.commands.menu.script | op | Allows use of all /menu script commands |
Specific Menu Use
cyom.menu.[id] (default none)
Allows opening of a specific menu with given id using the /menu open command without needing the "cyom.commands.menu.open" permission
This can be used to allow players to open certain menus but not others. Be aware that it is also possible to open a menu for a player without them having the permission using the /menu open [player] [menu id] command.
Allow Commands for Player
cyom.script.command.[command name] (default op)
Allows use of the specific command in menu scripts overriding command blacklist and whitelist. This means you can take finer control over what commands players are allowed to use in menu script items.