
Tutorial
Cannons has become a very complex plugin but is still very easy to use. This guide will help you to install and configure Cannons on your server.
Installation
- download the latest version of Cannons from here
- further this plugin loads all cannon designs from a .schematic and requires therefore Worldedit. You can find it here
- copy both files to the plugin folder of your server
- to use Cannons you need permissions. Here you have two ways be OP, which gives you all permissions, or set up a permission system (e.g. permissionsEx). More details can be found here
- run the server
- type '/cannons' to check if the plugin is responding
Build a cannon
Cannons ships with 3 default designs which are very basic. All cannon design have required blocks, like barrel and a firing trigger. But there are also optional block like redstone wires/repeaters/torches and chest/signs which are not need.
However wiring a cannon with redstone allows you to fire from a distance, or set up a trap. Redstone wiring and repeater are interchangeable and are connected to the backside button or torch of the cannon. Redstone torches are placed underneath the barrel for all default design. If you create your own design you can change this.
Chests are important for auto reloading and will transfer gunpowder and a projectile to the cannon before firing. A cannon can auto reload when fired with redstone (needs cannon design: autoreloadRedstone) or when fired by a player (shift+right click the torch if he has the permission: 'cannons.player.autoreload').
Signs makes cannons moveable and can therefore be on a ship. You will need this for plugins like movecraft and iSail. Chest and Signs share the same id in the .schematic design and can be placed on several different locations on the barrel.
Lets check how the default designs look like:
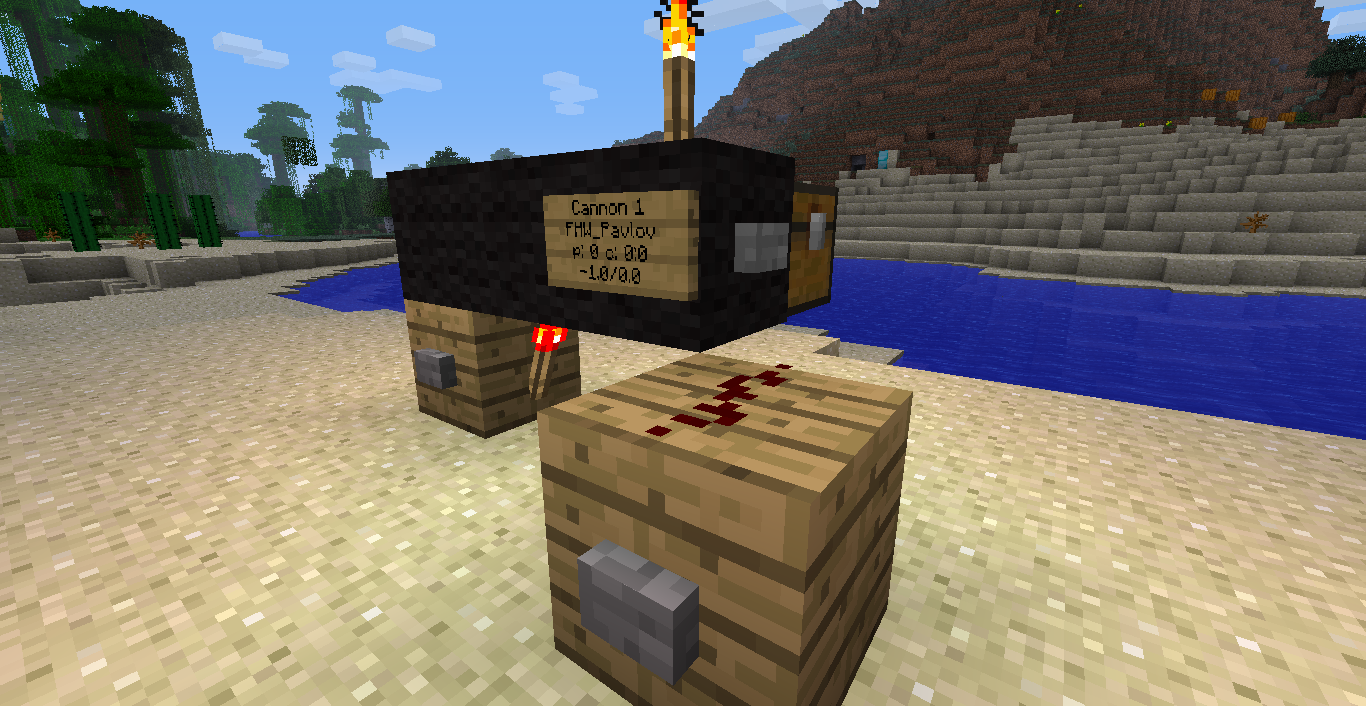
Classic
This design I like most, but some might complain that it is cheap to build and breaks very easy, since it is made of wool. Three blocks wool, 2 buttons on each side of the barrel and a torch, to fire the cannon.
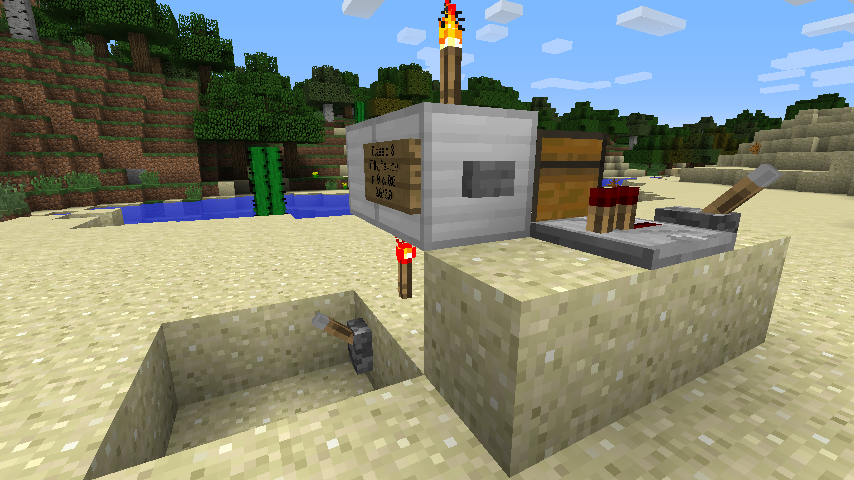
IronCannon
To make it more expensive to create cannons I created a design made out of iron. Simple two iron blocks in a row, buttons on both sides of the barrel and a torch on top.

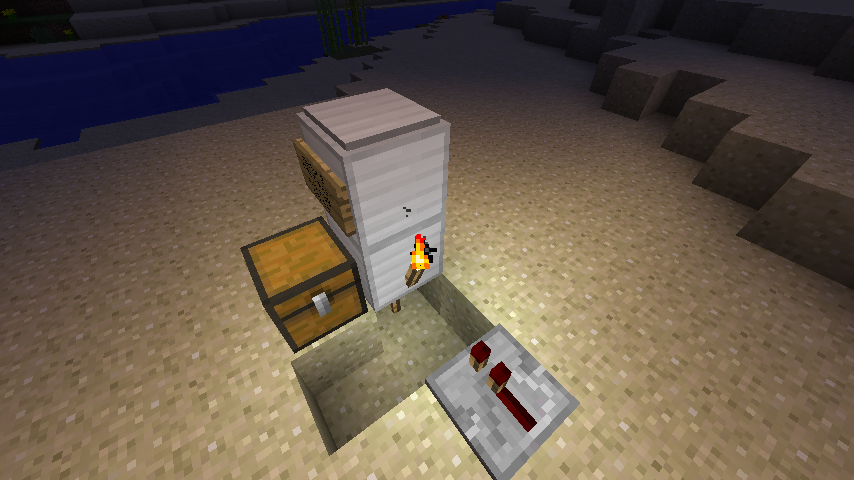
Mortar
To bombard heavy fortified targets you will need a mortar. Stack two iron blocks in vertical direction, a pressure plate on top and a torch on the bottom.
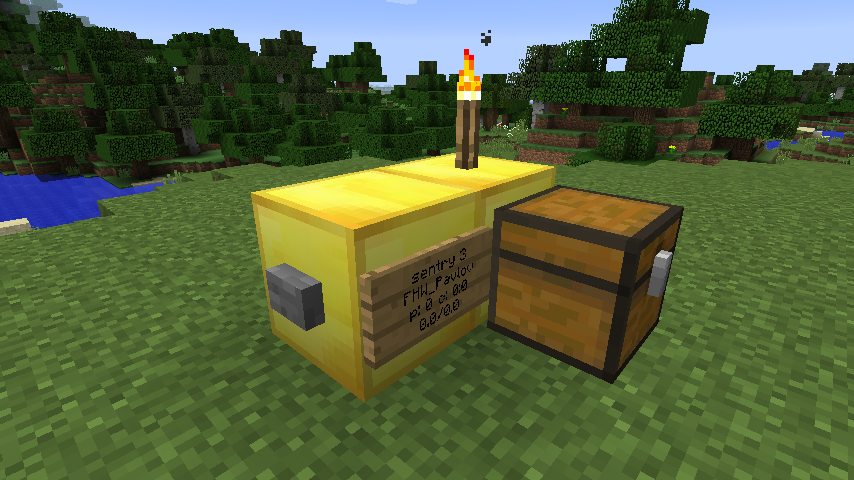
Sentry
The sentry cannon is made out of gold block and will target and eliminate monster by itself. Simple two gold blocks in a row, buttons on both sides of the barrel and a torch on top.
Note: You can set the sentry to manual mode, by powering the barrel (with a torch, lever,...). In manual mode the sentry will NOT search for new targets and fire automatically. However, it will try to track the an existing target and load.
Targeting: Depending on the projectile type the sentry will target the ground underneath or the head. Exploding shells with explosionPower > 2 or playerDamage > 1 and playerDamageRange > 2 will aim for the ground. To aim for the head you have to set smaller values for both entries.
Custom design
Since I am not the best designer I offer you the possibility to create your own cannon design. You can also make the cannon more expensive by replacing the wool block with e.g. obsidian. Alternatively you can also create custom blocks with a new data value which does not exist in the vanilla version. You can build whatever you want, if you would like to have a catapult - make it.
Best you load one of my designs with worldedit and edit it, like described here.
Operating a cannon
When you created a cannon you will get a message: "Cannon created". Now you have a fully functional cannon, but what can you do with it?
Loading
The first thing would be loading a cannon, which consists of 4 steps:
- Cleaning: First you need to clean the barrel with a ramrod (default: stick). You can change this item via config file. Click the barrel until the cannon is clean enough for firing. If your cannon does not produce much soot (cannonDesign/sootPerGunpowder) you don't have to clean it all the time. To disable this feature set sootPerGunpowder:0 and startingSoot:0 in you cannon design.
- Loading gunpowder: Second you have to load gunpowder. Do this by clicking the barrel with the gunpowder item (changeable in the cannon design). The more gunpowder you load, the faster the projectile will be. Note there is a maximum gunpowder which is recommended by the manufacturer. However you can overload the cannon with gunpowder to get the boost in range. But the cannon can explode when too much gunpowder is loaded.
TIPP: If you click a loaded cannon with the thermometer (gold nugget) you get the explosion probability. - Loading projectile: Next step would be loading a cannonball by right clicking with the projectile on the barrel. You have different projectiles (e.g: cobblstone, tnt, ...) in the vanilla Cannons plugin, but I recommend to create you own cannonballs. A detailed description is in the next section.
- Pushing projectile: Final step is pushing the projectile into the barrel to fix the charge. If the this is done the cannon is ready to fire. How often the projectile needs to be pushed can be set in the cannon design via projectilePushing.
Aiming
You can fire now, but we should first adjust the cannon to hit the target. Adjusting can be done manually or automatically if you look in the direction you want to fire:
- Manually aiming is done by right clicking the barrel with no item in the hand (changeable via main config). You can aim up/down and left/right. Use shift+right click to invert the aiming (e.g. Click the upper part and still aim down).
- Autoaiming can be activated by clicking the cannon with the auto aiming item (clock). When you have entered the aiming mode you can change the angle by looking in the direction and holding shift. If you don't press shift it will not change the angle.
If you stop aiming for a short time you will get an redstone lamp as impact marker (not supported by spigot). Note: The cannon has to be loaded which a projectile to get an impact marker.
Firing
You are aiming at the target and the cannon is loaded? Firing can be done by clicking the torch on the cannon (rightClickTrigger), the button on the back (redstoneTrigger), via redstone torch underneath the barrel (redstoneTorch) or with redstone wiring/repeater of the back button (restoneWireAndRepeater). After activating one of these things the cannon will fire after a short time (fuseBurnTime). Note: You can also reload the cannon from a chest with shift+right click on the torch or use redstone autoreload (cannons design).
Loading a projectile
What would a cannon be without a projectile? Therefore Cannons ships four default projectiles. However these projectiles are more for demonstration and you have to tweak them for your special needs. I highly recommend to create new projectiles and modify the old projectiles.
Classic cannonball: cobblestone
Most of the player will have more than enough cobblestone, therefore the properties of this cannonball are moderate. It is a very simple projectile which creates a small explosion on impact. Despite the projectile can destroy obsidian, stationary water/laver since it has the superbreaker ability.
Canistershot: melon seed
This projectile consists of several smaller projectiles which will be fired at once with a large spread. It turns the cannon in a giant shotgun with devastating effect on unarmored targets. It has no effect on blocks.
Clusterbomb: TNT
This projectile is more advanced than the 'classic' cannonball. After impact this projectile will spawn several primed TNT blocks which explode after 1s.
Teleporting: enderpearl
This is a demonstrator for the teleporting features of cannons. There are two possibilities available: teleporter, observer. The teleporter will teleporter you to the impact of the projectile, while the observer will show you the impact and then teleports you back to the cannon. However you are vulnerable in that time. So be careful.
Fireworks: rocket
The firework projectile has 4 different design files (firework1.yml - firework4.yml). The firework1 projectile is loaded with simple gunpowder paper rocket ('401:0'). The projectile will explode after a fuse time of 1s and a firework effect will be created on the impact location. Further several new firework2 projectiles are spawned. The velocity and amount is given by the firework2 projectile file. This projectile will then spawn firework3 and firework4.
Custom cannonball
For your server you will probably need more than 4 projectiles. To create a new projectile copy a default one and modify it. You have to consider these 3 things:
- the filename is used as an unique name for the design and is stored with this name in the database.
- make sure that projectile 'loading items' are unique for all cannon designs. In other words, you can have the same 'loading item' if you load them into different cannon. However if you have two projectiles with the same 'loading item' on one cannon...
- add the name of the projectiles to 'allowedProjectiles' to each cannon design which can fire it. Else you have a new projectile but can not load it to a cannon. More information about all properties of a cannonball can be found in the projectile .yml file or here.
Localization
The localization file can be found in plugins/Cannons/localization/localization.yml. Cannons ships with two different localizations (english, german), whereas english is set by default. To switch to the german localization you have to copy the text of the file.
Certain strings have capitalised words. These word will be replaced by the plugin. E.g. the word GUNPOWDER will be replaced by the number of gunpowder which are loaded in this cannon.
Feel free edit and adapt the localization file.
Hint: If you don't want a certain message you can disable it by setting the string to ' '. (A string with only one space)
Named Items
Added: v.2.3
If you want to used named items as gunpowder, projectiles or tools you can do so in Cannons v.2.3 and newer. You can use a display name or lore for any item which interacts with the cannon as item (everything you hold in your inventory). The old style with id:data still works, but you can now add additional parameters as display name and lore. If the display name or the lore is not empty your loaded item has to match all of these. The item can have more lore entries than the config, but must have all the lore entries give in the config. However you can leave values empty and they will ignored - the projectile can have a different display name if you leave this blank. You can add as many lore as you like and the order is not important.
The following works:
- id:data old style - display lore will be ignored but the item must not be named
- id:data:description just named items - lore will be ignored
- id:data::lore1:lore2:.. just a lore no display name checking
- id:data:description:lore1:lore2:... display name and lore have to match
Spawn Entity Data
Added: v.2.4.3
In previous versions it was not possible to add additional information for spawned entities at cannonball impact - a spawned zombie would have no armor, a thrown potion not effect. Since 2.4.3 there is an additional string to add more information for the spawned entity. This feature uses a similar style as the minecraft command to '/summon' entities. Slight variations have been necessary to keep it simple (no nested braces), and bukkit compatible. The structure looks like this:
- 'ENTITY min-max DATA'
Where ENTITY is the bukkit name of the entity, min the minimum number and max the maximum number of entities, and DATA the additional information of the entities you want to spawn.
For a complete list of spawnable entities check out this list:
https://hub.spigotmc.org/javadocs/bukkit/org/bukkit/entity/EntityType.html
- Lingering and splash potion
Use the 'long' to extend the duration and 'strong' to increase the strength of the potion. More Potion effect can be found here:
https://hub.spigotmc.org/javadocs/bukkit/org/bukkit/potion/PotionType.html- - 'LINGERING_POTION 20-50 {Potion:long_poison}'
- - 'SPLASH_POTION 20-50 {Potion:strong_heal}'
- Equipped Entities
Living entities can wear armor and items, and will drop these when kill. A list of items as equipment can be found here:
https://hub.spigotmc.org/javadocs/bukkit/org/bukkit/Material.html- - 'ZOMBIE 1-4{HelmetArmorItem:Iron_Helmet, LeggingsArmorItem:IRON_LEGGINGS, ChestplateArmorItem:IRON_CHESTPLATE, BootsArmorItem:Iron_Boots, MainHandItem:IRON_AXE, OffHandItem:SHIELD}'
- Area of Effect Clouds
This clouds works similar to lingering potions, but have more options. They will always spawn on the ground (if there is any).
Particle names can be found here:
https://hub.spigotmc.org/javadocs/bukkit/org/bukkit/Particle.html
More Potion effect can be found here:
https://hub.spigotmc.org/javadocs/bukkit/org/bukkit/potion/PotionType.html- - 'AREA_EFFECT_CLOUD 1-3 {Color:16711680, Duration:100, Radius:3, Potion:poison}'
- - 'AREA_EFFECT_CLOUD 1-3 {Particle:FLAME}'
- - 'AREA_EFFECT_CLOUD 1-3 {RadiusPerTick:-0.005, RadiusOnUse:0.001}'
- - 'AREA_EFFECT_CLOUD 1-3 {DurationOnUse:-0.1}'
- Arrows
All type of arrows can be spawned by this command.- - 'ARROW 30-50'
- - 'TIPPED_ARROW 30-50 {Potion:poison}'
- - 'SPECTRAL_ARROW 30-50 {Duration:100}'
- TNT
Primed TNT now also uses the data values to set the fuse time in ticks.- - 'TNT 3-5 {Fuse:100}'
Further things which have no data, but look nice nevertheless: FIREBALL, THROWN_EXP_BOTTLE, EGG,...
Frequently asked questions
- My server gives me a warning with "executing 1 of 1 create table cannonlist_2_3" or similar. What should I do?
When you run Cannons the first time, it will create a database. Do not worry about this message.
- There is a Error "ebean.properties not found". Is this a problem?
No it is not a problem. You can ignore this message or just create the file to keep the server happy.
- There is a new cannon design/projectile available, but I can't find it on my server. How can I get it?
Cannons will copy the default designs/projectiles if the design/projectile folder does not exist. Rename the folders and it will create new folder with the default files.
- My config.yml is missing some options:
Bukkit can't add new options in the config file without deleting the comments. Since comments make it easier to understand you have to add the option by yourself. Look here for the all options and add them to your config file.
https://github.com/DerPavlov/Cannons/blob/master/src/main/resources/config.yml
- Cannonballs destroy protected regions:
Cannons does not use any unsafe code and it should work with all region protection plugins. For worldguard I use the "other-explosion" deny flag to protect area from cannonball impacts and cannon explosions. Note: Spigot added a new event for explosions in 1.8.3, which is still not supported by all plugins. Use "relayExplosionEvent: true" in the Cannons config.yml to switch back to the old event.
- My sentry is always aiming for the ground, how can I make it aim for the head?
Exploding shells with explosionPower > 2 or playerDamage > 1 and playerDamageRange > 2 will aim for the ground, while non exploding shells will target the head. For a non-exploding shell you have to set smaller values for both 'explosionPower: 1.' and 'playerDamageRange: 1'.