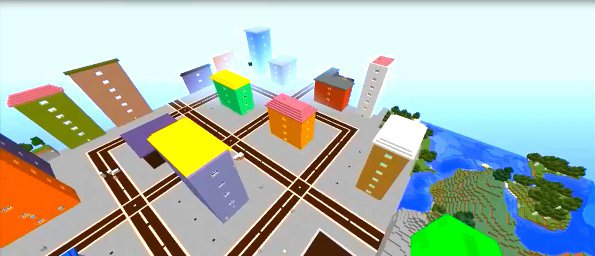
DPCityMaker

With DPCityMaker you can build a whole city in a very short time using simple consolle commands.
You can build a whole city in 20 minutes.
DPCityMaker is ideal to build adventure maps very quickly.
You can also use it to build the basic structure of the city and then add more details.
Each command generates an area of 16x16 blocks of the city that we'll call section.
There are commands to build various sections of a city: roads, buildings, parks, floors.
Commands are very simple to use to build standard structures, and there are also advanced commands to build custom buildings and roads.
I strongly suggest to watch following video tutorial to understand how to use it.
It's very easy to add monsters spawners to roads and buildings.You can also add spawners to any natural biome of your Minecraft world.
There are commands to switch to building mode when you are building or modify your project, and to playing mode when you are ready to publish your map.
Download
version 1.9
http://dev.bukkit.org/media/files/918/889/dpcitymaker1_9.jar
version 1.8
http://dev.bukkit.org/media/files/918/556/dp_city_maker.jar
Video Tutorial:
Quick tutorial
you can find detailed tutorials here:
http://dev.bukkit.org/bukkit-plugins/dpcitymaker/pages/tutorials/
Installation
Just download DPCityMaker and copy it to your plugins folder.
You don't need any special plugin to use DPCityMaker.
You need full permissions to modify world and switch to creative.
I suggest to give all permissions to opped player who builds the map.
Commands
/addlights : adds lights from the center of the block 16x16
/addtrees : adds trees from the center of the block 16x16
/blockmove [direction] : teleports player in next building position using last block built
/bonus [item name] : put a command block that gives a bonus under player's feet
/bonuschest : spawn a bonus chest with random item
/building [direction] : builds a random building
/building_spawners [monstername)][direction] : builds a random building with spawners
/building_custom [sizex 6-14][sizez 6-14][floorheight][floors 2-32][roofheight 0-5][walls material][floor material][roof material][spawners (no|rnd|monstername)][direction]
: builds a custom building
/carpark [direction] : builds a carpark
/crossroad [direction] : builds a crossroad
/crossroad [tracksize (1-7)][ground material][road material][border material][line material][direction]
: builds a custom crossroad
/floor [material][direction] : builds a floor
/modebuild : switch to creative mode and difficulty peaceful
/modeplay : switch to adventure mode, difficulty normal and always night
/move [direction] : move to next chunk
/park [direction] : builds a park with trees
/road [direction] : builds a standard road
/road_custom [tracksize (1-7)][ground material][road material][border material][line material][direction]
: builds a custom road
/road_custom_left [tracksize (1-7)][ground material][road material][border material][line material][direction]
: builds a custom road turning left
/road_custom_right [tracksize (1-7)][ground material][road material][border material][line material][direction]
: builds a custom road turning right
/road_left [direction] : builds a standard road turning left
/road_right [direction] : builds a standard road turning right
/spawner [monstername|rnd] : put a spawner under player's feet
/spawners [monstername|rnd] : puts monster spawners in random position
Getting started
Find a good place where you want your city.
Use /modebuild to switch in creative mode,peaceful and set the time at day.
You can start building main downtown roads, in the tutorial we start with crossroad at the center of the city.
Before building any section you must choose a direction: east, west, north or south.
Then pass it as argument to the building command. You must do this every time command needs [direction] as argument.
For more info please type /help and then the name of the command you are going to use.
Always use lowercase for every command or argument, except for the argument [monstername] that we'll see forward.
Use /crossroad [direction] to build crossroads, /road [direction] to build roads.
I suggest to look towards direction you want to build next section and press F3 to know direction name.
For example you look north and then you write /crossroad north.
Use /road_left or /road_right, if you want a road turning left or right 90 degrees.
This avoid you to build with gaps or overwrite existing sections.
Use /floor [material][direction] if you want to flatten an area and generate a plain floor of a material.
For example you can use /floor stone east, if you want to build a stone floor section towards east direction.
When a command requires argument [material], you can use any Minecraft material without data values (please chek the Minecraft wiki for more info).
You can also use a color for argument [material], for example white, to build blocks of colored stained clay.
Here following values you can use to spawn colored clay:
white, orange,magenta, lightblue, yellow, lime, pink, gray, lightgray, cyan, purple, blue, brown, green, red, black.
for example you can type /floor pink west to create a pink stained clay floor towards east.
You can use value 'rnd' to generate a random material.
for example you can type /floor rnd north to create a floor towards north made of a random material.
Random materials are picked up from a restricted list suitable for building and roads construction.
You can use values above any time a command requires argument [material].
Other commands
Use /park [direction] to build a gras floor with random trees.
Use /carpark [direction] to build a car park.
Use /addlights or /addtrees to add streetlights and trees to any section of the city.
Thede last two commands don't require a direction: just go to the center of the section and use the command.
Buildings
Use /building [direction] to generate a new section with a random building at its center.
Buildings have a standard template in which parameters have random values.
When you create a building, door will be placed in the side of the building looking to the player.
Buildings have a random number of floors. Each floor is accessible by stairs or by elevator.
There is a light system made by swithced off redstone lamps. You can switch them on using a lever placed over them.
Random bonuses are placed in every floor like beds, crafting tables, furnaces, anvils, enchanting tables, bonus chests.
Monster spawners
You can add monster spawners to every section using command /spawners [monstername]
You can generate building with spawners inside using command /building_spawners [monstername][direction]
Argument [monstername] requires Minecraft name for the monster you want to spawn (always check the MC wiki for more info)
You can also use value 'rnd' to spawn a random overworld monster: Creeper, Skeleton, Spider or Zombie.
When you use 'rnd' value each spawners may spawn a different monster in the list above.
For example use /spawners rnd to add random monster spawners to the section.
/spawners doesn't require a direction: just go to the center of the section you want to add spawners and type it.
Mind the gap!
When you build sections be careful not to leave gaps between them. There are special blocks to help you with this.
We'll call these blocks markers. Any generated section has 5 markers, 1 at the center of the section, and 4 at the center of each border of the section. When you build next section just walk to the central marker, choose direction for next section, and step over the marker placed at correspondent border in that direction (for more info look the video tutorials!).
Custom buildings and roads
You can customize roads and buildings, passing parameters like sizes and materials.
Roads:
/road_custom [tracksize (1-7)][ground material][road material][border material][line material][direction]
track size is the half size of the road, there is a line between the two tracks, so road size will be road size=track size*2 + 1
ground material is the material for the section floor around the road.
road material is the material of the tracks
border material is the material for the two lines at the borders of the road
line material is the material for the live between the tracks
direction is north, south, east or west, towards the road goes.
Custom crossroads: use /crossroad_custom, parameters are identical for /road_custom, keep same values if you are connecting it to a custom road
Custom roads turning left or right: use /road_custom_left or /road_custom_right, use same parameter from the custom_road
Here a tip: you can copy and paste parameters and change only the main command when building a custom roads system.
Extra bonuses: command /bonus [itemname] spwans a command block at the player position with a button, when a player presses the button a bonus item will be given to that player.
itemname: minecraft name of the item given by the command block (check the MC wiki for the correct spelling of item names) {this works only with 1.8 versions)
Buildings:
/building_custom [sizex 6-14][sizez 6-14][floorheight][floors 2-32][roofheight 0-5][walls material][floor material][roof material][spawners (no|rnd|monstername)][direction]
sizex, sizez: are the building area dimensions
floorheight: height from the floor to the ceil for each floor of the building
floors: number of floors for the building
roofheight: height of the roof
spawners: if building has spawners specify the minecraft name of the monster, for example Enderman, (remeber to spell correctly the monster name and check the minecraft wiki)
if building doesn't have spwaners use value 'no'
if you want random monsters spawners use value 'rnd'
When you build a custom building you can copy and paste the whole command and parameters in a text editor, and save it if you want to build and identical buulding in an other location.
You can complete customization manually adding every detail you want in creative.
Building and testing a map
This plugin is very useful if you want to make adventure maps very quickly.
When you start building I suggesto to use command /modebuild that switch you in creative mode, peaceful and sets the time to day.
When you finish the map and you are ready to test you can use /modeplay, this command will switch you in adventure mode and adjust some settings to test the game.
Publishing a map
If you want to publish your map, go to the location where you want the player to first spawn. use /modeplay.
Log out your server (I suggest use this plugin in localhost), and go to your server folder.
Copy the world folder and paste it in your desktop. Now you can upload it on online servers or map sites.
Please remeber to include the link to this page when you publish a map with this plugin.
You are free to use this plugin for your maps and for your videos.
Pictures


Comments


-

_ForgeUser23258235 Owner
-
View User Profile
-
Send Message
Posted May 26, 2016I don't know I just work on bukkit...
-
View User Profile
-
Send Message
Posted May 23, 2016@dicchiferlenghi
what about spigot 1.9.4
-
View User Profile
-
Send Message
Posted May 22, 2016Just testing with craftbukkit 1.9, it seems working good, only spawners don't work, but new update working is coming today
-
View User Profile
-
Send Message
Posted May 20, 2016@XxthedarkkingxX
you can build the map in 1.8 then save it and open in 1.9 command /bonus may not work in 1.9
-
View User Profile
-
Send Message
Posted May 19, 2016will it function for 1.9.x